Using the SDK with Objective-C code
Overview
Although the LINE SDK for iOS Swift is written in pure Swift, you can still use it in Objective-C projects. There are two options to do so.
Option 1: Make a mixed-language project
If you have some experience with Swift and Swift/Objective-C interoperability, we recommend that you integrate the LINE SDK for iOS Swift directly into your Objective-C project and use Swift to call the LINE SDK's APIs.
Any existing Objective-C project can be turned into a mixed-language project of Objective-C and Swift. You can add Swift files that interact with the LINE SDK for iOS Swift in a mixed-language project.
To use the necessary declarations from your Swift files with Objective-C, expose them with the @objc or @objcMembers attributes. For more information about these attributes, see Attributes by Swift.org.
When you import Swift files into your project, Xcode automatically generates a bridging header file to expose those files to Objective-C code. For more information about the bridging header, see Importing Swift into Objective-C by Apple.
To understand how to make Swift classes available in an Objective-C project, we recommend these articles too:
- Setting up Swift and Objective-C Interoperability by Jen Sipila: Especially, check the "Make a Swift Class available to Objective-C Files" section.
- Migrating Your Objective-C Code to Swift by Apple: This article helps you to understand the whole process.
Option 2: Use the Objective-C wrapper
To use Objective-C code to interact with the LINE SDK for iOS Swift, use the Objective-C wrapper provided in the LINE SDK for iOS Swift. Unlike with option 1, you need to add the additional Objective-C wrapper framework to your project. This section covers basic concepts, installation, and common uses of the Objective-C wrapper.
The LINE SDK for iOS Swift is compatible only with Swift code. The Objective-C wrapper is implemented over the core SDK to make it compatible with Objective-C code and provide most of the core functionality from the LINE SDK for iOS Swift. Some features are not available with the Objective-C wrapper due to the limitations from the Objective-C specification that is not fully compatible with Swift.
The type names and most of the SDK components are prefixed with "LineSDK" to avoid potential naming conflicts with those of the original SDK. The wrapper also requires additional steps to set up.
Keep in mind that the wrapper is a temporary method to use the LINE SDK for iOS Swift. We recommend migrating your project to Swift to access the full functionality of the LINE SDK for iOS Swift.
Installation
Prerequisites
To build and use the LINE SDK for iOS Swift with the Objective-C wrapper, you need:
- iOS 11.0 or later as the deployment target.
- Xcode 10 or later.
CocoaPods
If you are not familiar with CocoaPods, see the CocoaPods Getting Started Guide. You will need the CocoaPods gem installed on your machine before integrating the LINE SDK for iOS Swift into your app through CocoaPods.
- Once your Podfile is prepared, add the pod command below to your target:
- Run the following command:
- The LINE SDK for iOS Swift will be downloaded and integrated into your Xcode workspace.
Importing the SDK
Add @import LineSDK; to import the LINE SDK for iOS Swift with the Objective-C wrapper into your Objective-C project as below:
Carthage
Carthage is a decentralized dependency manager that builds your dependencies and provides you with binary frameworks.
- To install the Carthage tool, use Homebrew.
- To integrate the LINE SDK for iOS Swift into your Xcode project using Carthage, specify the GitHub repository of the SDK in your Cartfile as below:
- Run the following command to build the LINE SDK for iOS Swift:
Now you can add the built LineSDK.framework and LineSDKObjC.framework files to your Xcode project by following the steps described in the following sections.
Linking the framework files to your Xcode project
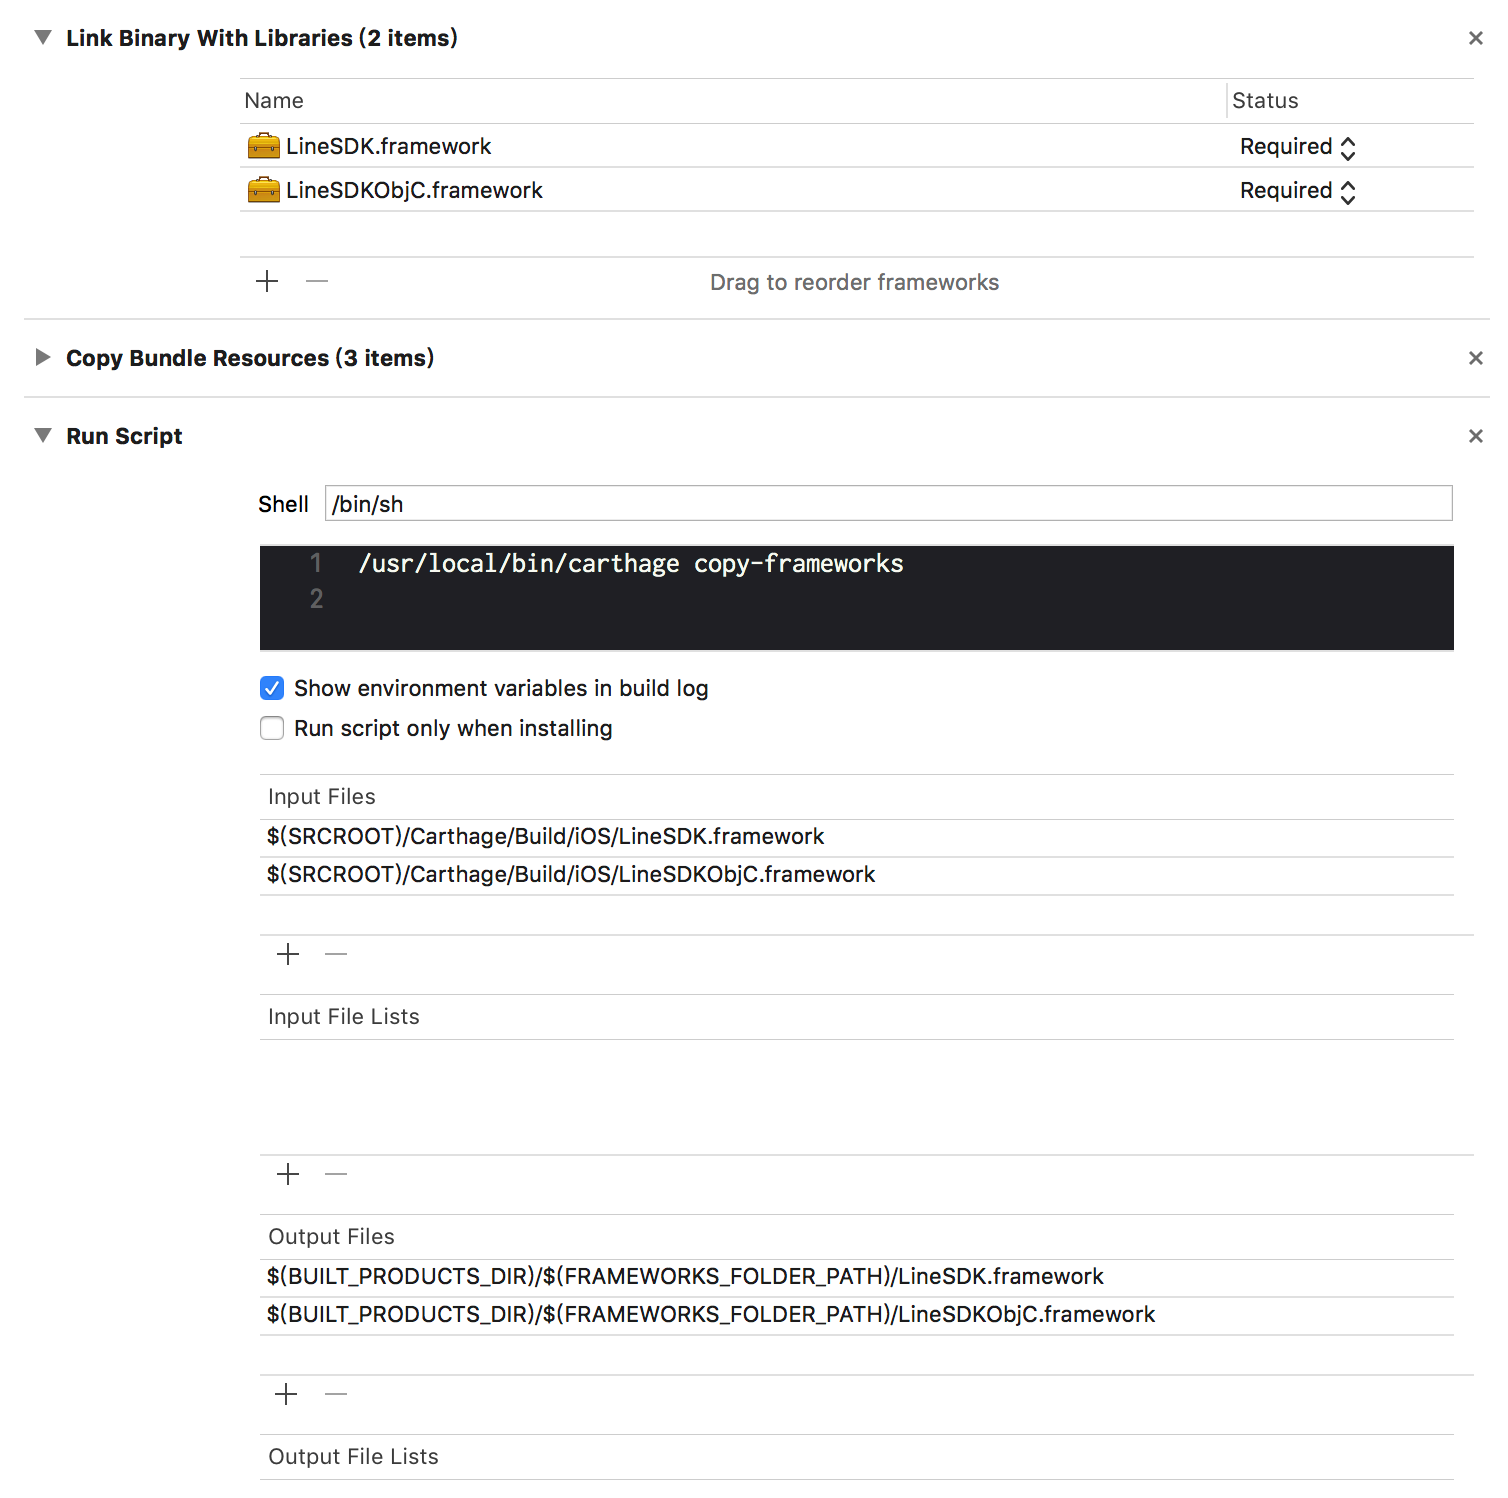
Drag and drop the LineSDK.framework and LineSDKObjC.framework files from the Carthage/Build/iOS folder to the "Link Binary With Libraries" section on your application target’s "Build Phases" settings tab.
Copying the framework files during the build phase
- Click the + icon on your application target's "Build Phases" settings tab and choose New Run Script Phase. Create a run script with the following content:
- Add the path to the framework files under the "Input Files" section:
- Add the path to the framework files under the "Output Files" section:
The "Build Phases" tab should look like this:
Enabling the "Always Embed Swift Standard Libraries" option
In the "Build Settings" setting tab, set the "Always Embed Swift Standard Libraries" (ALWAYS_EMBED_SWIFT_STANDARD_LIBRARIES) option to "YES" to include Swift standard libraries in your final app bundle.
Importing the SDK
Add @import LineSDKObjC; to import the LINE SDK for iOS Swift with the Objective-C wrapper into your Objective-C project as below:
Naming conventions
When using the Objective-C wrapper, the type names and most of the SDK components are prefixed with "LineSDK". The following code samples show how to handle common tasks in Objective-C:
Logging in users with multiple permissions
Getting user profiles
Handling errors with the Objective-C wrapper
To ensure compatibility with Objective-C conventions, the Objective-C wrapper throws NSError objects. The following code checks whether an error is related to the LINE SDK.
All the errors thrown by the wrapper have the same code and userInfo properties as those thrown by the original LINE SDK for iOS Swift. You can use them to find out the reason for errors.
To find out how to identify and handle errors, see Handling errors.