Build a bot
This guide describes how to use the Messaging API to build a LINE bot.
Before you begin
Before you start to set up and build a bot, make sure you have:
- A dedicated Messaging API channel for your bot
- A server to host your bot
Settings on LINE Developers Console
Prepare a channel access token and set a webhook URL. The token is necessary for your bot to make calls to the Messaging API. The webhook URL is required for your bot to receive webhook payloads from the LINE Platform. After you complete the set up, add your LINE Official Account as a friend to verify.
Prepare a channel access token
Issue a channel access token if you don't have one yet. Channel access tokens are access tokens that are used for the Messaging API. You can issue any of these tokens:
- Channel access token with a user-specified expiration (Channel access token v2.1) (recommended)
- Stateless channel access token
- Short-lived channel access token
- Long-lived channel access token
Set a webhook URL
The webhook URL is the endpoint of your bot server to which the LINE Platform sends the webhook payloads. Only one bot server endpoint can be set in the webhook URL.
Use the following steps to set the webhook URL:
- Log in to the LINE Developers Console and click the provider the Messaging API channel belongs to.
- Click the Messaging API channel.
- Click the Messaging API tab.
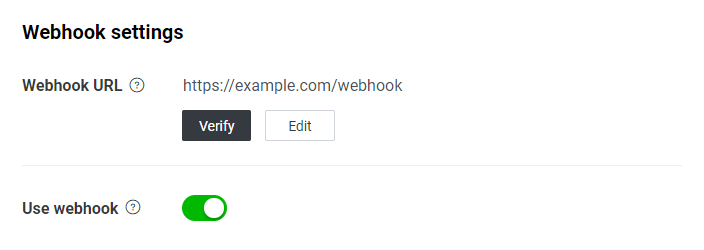
- Click Edit under Webhook URL. Enter the webhook URL (the destination where the LINE Platform is to send events to) and then click Update.
The webhook URL must use HTTPS and have an SSL/TLS certificate issued by a certificate authority widely trusted by general web browsers. Self-signed certificates aren't permitted. If you experience issues related to your SSL/TLS configuration, check whether your SSL/TLS certificate chain is complete and whether your intermediate certificates are correctly installed on your server. - Click Verify. If the webhook URL does accept a request, you'll see Success.
- Enable Use webhook.
Add your LINE Official Account as a friend
Add your LINE Official Account associated with the Messaging API channel as a friend to your LINE account, to test later on. An easy way to add is to scan the QR code on the Messaging API tab in the LINE Developers Console.
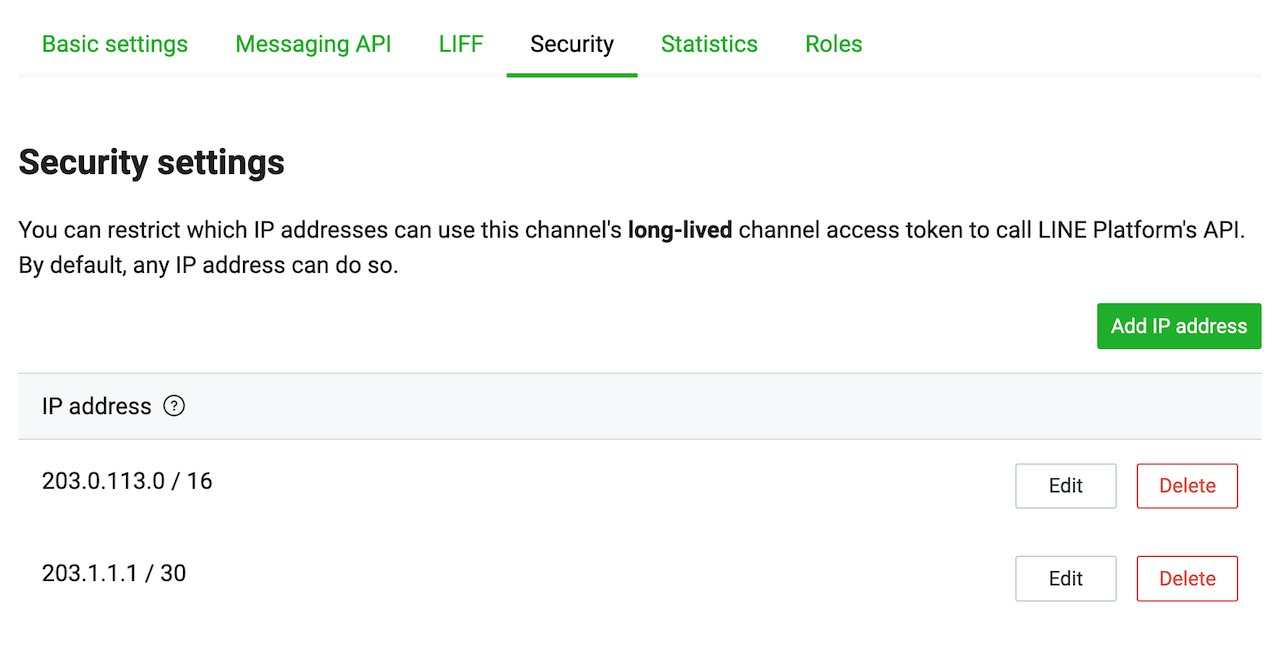
Restrict who can call the API when using a long-lived channel access token (optional)
When using a long-lived channel access token, you can restrict which server can call the LINE Platform API by IP address.
To register IP addresses, visit the LINE Developers Console, open the channel settings and the Security tab. You can register IP addresses one by one or use classless inter-domain routing (CIDR) notation to register your network address.
We recommend that you use a Channel access token with a user-specified expiration (Channel access token v2.1) in the Messaging API.
Verify that webhook works
When a user adds your LINE Official Account as a friend or sends a message to your LINE Official Account, the LINE Platform sends an HTTP POST request to your bot server. The destination of this request is the Webhook URL you register in the LINE Developers Console, on the Messaging API tab. The request contains a webhook event object, with a signature in the header.
This section explains how to check if your server can receive webhook events.
Receive webhook events
To check if your bot server does receive webhook events, first block the LINE Official Account you added in the earlier step. Then find from your server logs that your bot server received an unfollow event from the LINE Platform. Here is an example log.
If you got a similar log, your bot server did receive a webhook event from the LINE Platform. Don't forget to unblock the LINE Official Account after you check the log.
Settings on LINE Official Account Manager
The LINE Official Account Manager is a tool to manage your LINE Official Account. In addition to using the features provided by the Messaging API, you can improve the user experience by customizing your business profile, create LINE VOOM posts, and much more.
For a complete list of features available to LINE Official Accounts, see LY for Business.
If the settings for Greeting messages and Auto-reply messages are set to Enabled in the Messaging API Settings tab of the channel, the LINE Official Account will automatically respond when a user adds your LINE Official Account as a friend or sends you a message. The default setting for Greeting Message and Auto-reply messages is Enabled when the channel is created.
If you don't want greeting and response messages to be sent automatically because the response process is handled by the Messaging API, set the Greeting Messages and Auto-reply messages settings to Disabled in the LINE Official Account Manager.
You can use both together, such as using greeting messages to respond when a user adds your LINE Official Account as a friend, and using the Messaging API for other responses. But, you may find it difficult to identify whether an automatic response is sent from a greeting message or response message, or from a bot using the Messaging API. To avoid confusion, we recommend that you set the Greeting messages and Auto-reply messages settings to Disabled, especially if this is the first time for you to create a LINE Bot.
Customize your business profile
Business profile is where you enter and set the basic information of your LINE Official Account that gets displayed to users. You can customize the profile photo, cover photo, buttons, and plug-ins. To set your profile, go to the LINE Official Account Manager.
For more information about profile customization, see Profile (only available in Japanese) in LINE for Business.
Set a greeting message (optional)
You can send a greeting message when a user first adds your LINE Official Account as a friend. To set a greeting message, open the channel settings on the LINE Developers Console and click the Messaging API tab. Under Greeting messages, click Edit. This opens up the LINE Official Account Manager. Set a greeting message there. Alternatively, you can do this programmatically by responding to users after receiving a follow event.
Set auto reply messages (optional)
You can send auto reply messages to users when they send messages to your LINE Official Account. To set auto reply messages, open the channel settings on the LINE Developers Console and click the Messaging API tab. Under Auto-reply messages, click Edit. This opens up LINE Official Account Manager. Set auto reply messages there. But, you can do more with the Messaging API as you can program your bot to reply in different ways to various webhook events.
Next steps
Once you set up your bot, your LINE Official Account can receive messages from users and send messages to users. You can also use rich menus and quick replies to create a personalized experience. For more information on features available with the Messaging API, see the Messaging API documentation.