Use rich menus
This page explains how to set up a "default rich menu" that will be displayed to all users who have added your LINE official accounts as friends.
You can also set a default rich menu from LINE Official Account Manager. For more information, see Set rich menus with LINE Official Account Manager.
Set default rich menu
To set a default rich menu with the Messaging API:
- Prepare a rich menu image.
- Create a rich menu and specify tappable areas.
- Upload and attach the rich menu image.
- Set the default rich menu.
1. Prepare a rich menu image
Prepare a rich menu image. You need to think about how you'll place the tap area on the rich menu image.
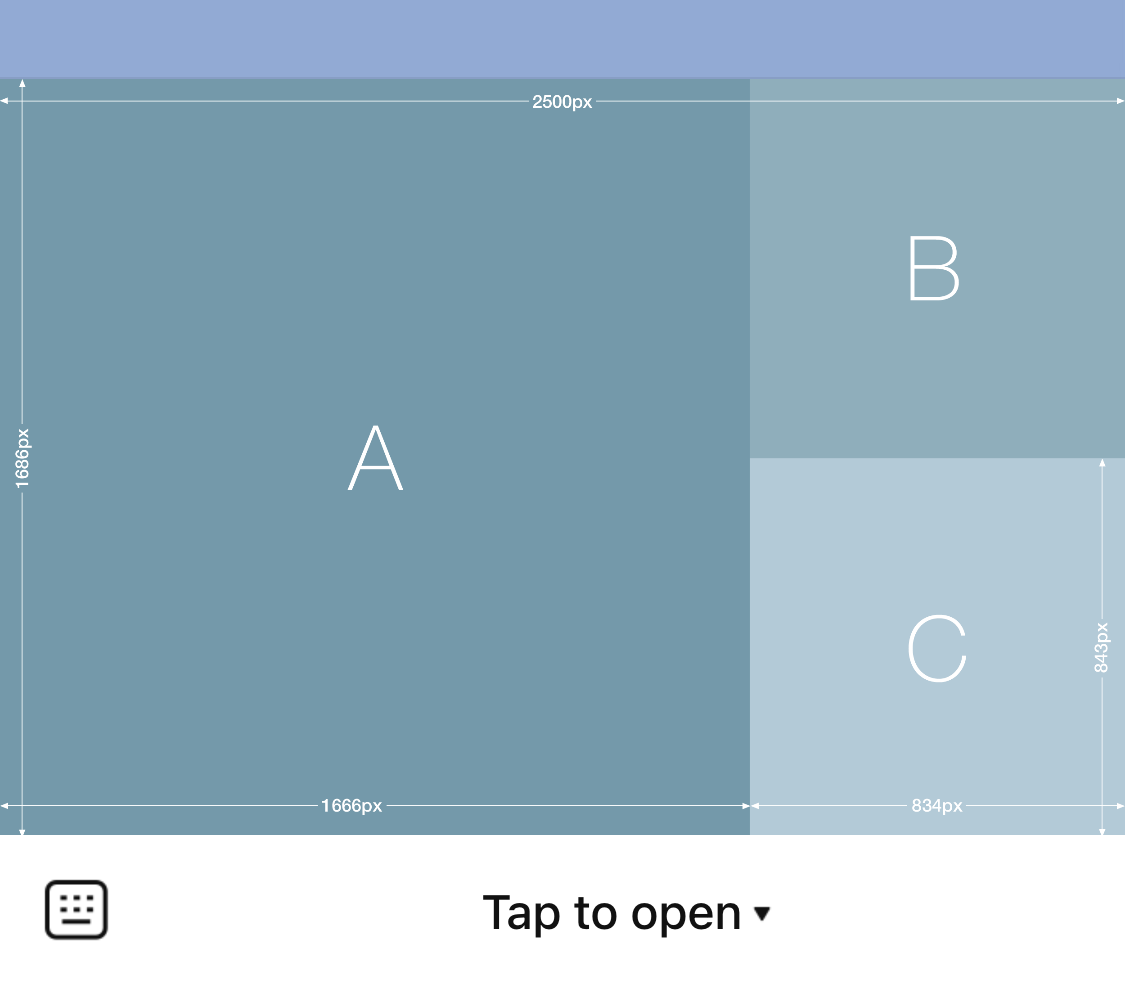
Here we use the following template image (richmenu-template-guide-04.png) for the rich menu. Save it in any directory.

In the case of this image, it's assumed that three tap areas, A, B, and C, are defined.
You can download a template image for your rich menu from the LINE Official Account Manager. From the page you create rich menus, click Design guide. You can log in to the LINE Official Account Manager with the same account you use for the LINE Developers Console.
For more information about image requirements, see Requirements for rich menu image in the Messaging API reference.
2. Create a rich menu
Create a rich menu that matches the rich menu image we prepared in step 1. Make sure that the tap areas are correctly set to A, B, and C in the image.
When you create a rich menu with the Messaging API, specify a rich menu object in the request body. Run this command in your terminal. The URI action is specified to open different URLs in each of the A, B, and C tap areas.
- To automatically open a rich menu linked to a user, set the
selectedproperty in the request body totrue. - To set the text of the chat bar, specify the
chatBarTextproperty in the request body. - Before creating a rich menu, you can check the validity of the rich menu object.
If the rich menu was created successfully, the rich menu ID is returned in the response. We'll use the rich menu ID in the following steps.
3. Upload and attach the rich menu image
Upload and attach the image you prepared in step 1 to the rich menu you created in step 2. In your terminal, run the following command:
- Move to the directory that contains the image you prepared in step 1.
- Run this command after replacing
{richMenuId}with the rich menu ID you obtained in step 2.
4. Set the default rich menu
Now that we've completed the preparations, let's set the display of the rich menu. Here, set a default rich menu. Users who are friends with your LINE Official Account sees the default rich menu, unless the user isn't linked to a per-user rich menu. Run this command in your terminal.
4-1. Check the rich menu displa
Check that the default rich menu set is displayed. Open the chat screen of the LINE Official Account for which you've set the rich menu. The rich menu created this time is displayed in a closed state, tap Tap to open to open the rich menu.
About per-user rich menu
You can set a rich menu on a per-user basis using the Messaging API. For more information on per-user rich menus, see Use per-user rich menus.