Getting started with LINE Login
This page explains how to get started with LINE Login by deploying a simple starter web app. The web app lets users log in with their LINE accounts. You can use the access token issued when a user logs in to get the user's profile.
After completing all the steps on this page, you'll have a better understanding of how LINE Login works and how to build it into your web app.
We also offer starter apps for specific platforms:
Before you begin
Before you can use the LINE Login starter app, you'll need the following:
| Requirement | Description |
|---|---|
| LINE account | An account for the LINE app. You need a LINE account to try out the starter app. To create a LINE account, download LINE for iOS or LINE for Android and sign up. For more information about creating a new LINE account, see Create a new account (only available in Japanese) in the LINE user's guide. |
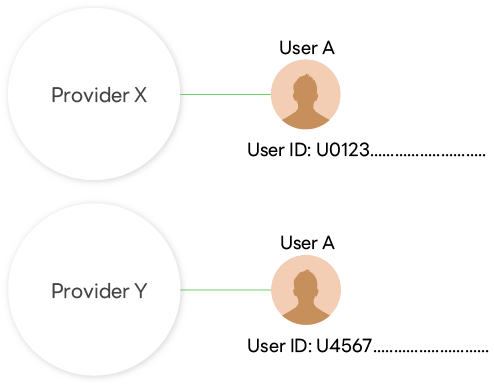
| Provider | Provider is a concept that describes the person or organization that provides the application. Create a provider on the LINE Developers Console. A LINE user has a different user ID for each provider. |
| LINE Login channel | A channel forms the connection between your app and the LINE Platform. Create a channel within the provider. You need to create a channel for each app. Create a LINE Login channel on the LINE Developers Console. Notes:
|
| Heroku account | Heroku is a service that offers hosting for web apps. Deploying the starter app to Heroku means you don't need your own server. |
| Heroku CLI | The Heroku Command Line Interface (CLI) is necessary for using certain Heroku functions. |
Heroku's free plan has been discontinued as of November 27, 2022. If you would like to try this starter app for free, use another platform. For more information, see Heroku’s Next Chapter.
Step 1: Create your LINE Login channel
Let's start with creating a LINE Login channel.
A channel is the conduit through which your app connects to the LINE Platform. Create a LINE Login channel in the LINE Developers Console for each of your web apps.
- Log in to the LINE Developers Console.
- Select a provider, and select LINE Login from the Channels tab.
- Input the required information in these fields to create a channel:
| Item | Required? | Description | Location displayed to users |
|---|---|---|---|
| Channel type | ✅ | The channel type. Select LINE Login to create your LINE Login Channel. | - |
| Provider | ✅ | The channel's provider | Permission consent screen when launching LINE Login or LIFF App |
| Region to provide the service | ✅ | The region you want to provide your LINE Login service. One of:
| - |
| Company or owner's country or region | ✅ | Country or region of the company or owner that manage the channel | Permission consent screen when launching LINE Login or LIFF App |
| Channel icon | ❌ | The channel's icon | Permission consent screen when launching LINE Login or LIFF App |
| Channel name | ✅ | The channel's name *Channel name can't contain "LINE" or similar strings. | Permission consent screen when launching LINE Login or LIFF App |
| Channel description | ✅ | The channel's description | Permission consent screen when launching LINE Login or LIFF App |
| App types | ✅ | The type of app you plan to integrate LINE Login with. One of:
| - |
| Email address | ✅ | Email address to receive important updates about the channel | - |
| Privacy policy URL | See description | The URL of the app's privacy policy. Required if your provider is a certified provider. | Permission consent screen when launching LINE Login or LIFF App |
| Terms of use URL | ❌ | The URL of the app's terms of use | Permission consent screen when launching LINE Login or LIFF App |
| LINE Developers Agreement | ✅ | Read and agree to the LINE Developers Agreement. | - |
| LY Corporation Privacy Policy | See description | Required only if you've selected Thailand as Region to provide the service. Read and acknowledge LY Corporation Privacy Policy. | - |
Precautions for channel and provider linkage
Once you create a channel, you can't move the channel to another provider later.
When developing a service that links a LINE Login channel with a Messaging API channel, create both channels within the same provider.
A LINE user who uses services provided by developers is given a different user ID for each provider. User IDs can't be used to identify the same user across channels under different providers.
For example, the following cases require special attention:
- Channels and providers are managed by individuals or companies.
- Create channels of unrelated services or companies under one provider.
- Channels are created under a provider managed by a service (company) that operates channel management tools, etc.
In such cases, problems may arise in the future due to the inability to move channels later between providers and the fact that a user is given different user IDs for different providers. After considering the risks involved, create a channel under the appropriate provider.
There is a page that explains, with specific examples, how to manage admin roles for providers and channels, and which provider you should create channels under.
For more information, see Best practices for provider and channel management in the LINE Developers Console documentation.
Step 2: Deploy the starter app
Next, deploy the starter app to Heroku using the channel ID and channel secret for the channel created in Step 1. Follow these steps:
- Go to the line-login-starter repository on GitHub.
- In the README, click Deploy to Heroku.
- Fill in the required information on the "Create New App" page in Heroku:
- Heroku app name
Must be unique. Suggestion:line-login-starter-{YYYYMMDD} - Region
- Config Variables
- Callback URL in the following format:
https://{Heroku app name}.herokuapp.com/auth - Channel ID (found in the LINE Developers Console)
- Channel secret (found in the LINE Developers Console)
- Callback URL in the following format:
- Heroku app name
- Select Deploy app and confirm that your app is successfully deployed.
Step 3: Check the channel settings and enter the callback URL
In order to use the LINE Login channel for web apps, the App Type and Callback URL must be set correctly.
- From the LINE Developers Console, select the channel you created in Step 1.
- Click the Basic settings tab, and make sure Web app is displayed under App types.
- Click the LINE Login tab and enter the Callback URL from Heroku (
https://{Heroku app name}.herokuapp.com/auth).
LINE Login's basic settings
The Basic settings tab contains basic information about your channel. Here's the information you'll find:
| Item | Description |
|---|---|
| Channel ID | Unique identifier for the channel |
| Region to provide the service | The region you want to provide your LINE Login service. You can only set the region when creating a new channel. |
| Company or owner's country or region | Country or region of the company or owner that manage the channel |
| Channel icon | The channel's icon |
| Channel name | The channel's name |
| Channel description | The channel's description |
| Email address | Email address to receive important updates about the channel |
| Privacy policy URL | The URL of the app's privacy policy |
| Terms of use URL | The URL of the app's terms of use |
| App types | The type of app you plan to integrate LINE Login with |
| Permissions | The type of user data this channel can access |
| Channel secret | A unique secret key you can use to grant an app access to your channel |
| Assertion Signing Key | The UUIDs associated with your assertion signing key pair |
| Your user ID | Your LINE account's user ID |
| Linked LINE Official Account | Your LINE Official Account linked to this channel. You can only link a LINE Official Account from the same provider. |
| Localization | You can add other languages to provide multi-language support for your channel. |
| Email address permission | Apply for permission to request a user's email using OpenID Connect. |
| Delete | Delete this channel. |
Step 4: Try the app
- Browse to the URL of your app (
https://{Heroku app name}.herokuapp.com). You should see this:
- Click Log in.
You'll be redirected to our standard login page. The URL starts withhttps://access.line.me/oauth2/v2.1/and contains a number of query parameters. To learn what they mean, read Integrating LINE Login with your web app. - Log in to LINE and agree to grant the required permissions to the app.
When you successfully log in with your LINE credentials, the app displays your LINE user profile image, display name, and status message. (If you're using an iOS or Android device and are already logged in to LINE, you'll be logged in automatically.)
Try out the other features of the starter app
Once you've logged into the app, you can select the following buttons to try out other features of this app:
- Verify the user access token
- Refresh the user access token
- Revoke the access token (log out)
Check logs
Check your app's logs with Heroku CLI.
- Log in to Heroku from the command line.
- Check the logs.
Step 5: Customize your app
You can download the starter app to your local machine to test and make changes for yourself. You can then deploy the app to a web server of your choice. Here, we'll look at how to make and deploy changes to the Heroku app you created in Step 1.
Make sure you have these installed:
- JDK 1.8 or later
- Maven™ 3.0 or later
- Git™
- Clone the line-login-starter GitHub repository.
cdintoline-login-starter.- Add a remote for Heroku to your local repository.
- Make edits and commit changes (optional).
- Push changes to Heroku master.
Step 6: Publish your channel (optional)
LINE Login channels are created with "Developing" status. With this status, only users with the Admin or Tester role (see Managing roles) can use the LINE Login channel. If you want to allow other users to access your app, you have to change the status of the app to "Published". To do so, open your LINE Login channel on the LINE Developers Console, and click the Developing status at the top of the page.
If your current channel is for testing purposes only, you can leave the status as it is. But to make any future app available to users, you'll need to publish the channel that it's linked to. Note that once you change the status to "Published", you can't change it back to "Developing".
How to test with a LINE Login channel with the "Developing" status
When testing with a LINE Login channel with the "Developing" status, a developer account that has been given a role to test on the channel must be linked to a LINE account. By linking a LINE account to the Business ID associated with your developer account, you can link your LINE account to your developer account.
Developer accounts are always linked to Business ID on a one-to-one basis. However, linking a Business ID to your LINE account is optional. Therefore, there may be cases where your Business ID and your LINE account are not linked. When testing LINE Login, make sure that your Business ID is linked to your LINE account.
When testing LINE Login, you will need to log in using your LINE account that is linked to your developer account. Note that you can't log in using the email address and password registered for your Business ID.
For more information on linking a Business ID with a LINE account, see Link your Business ID with your LINE account in the LINE Developers Console documentation.